 A note to all: I am in Tennessee USA. My experience and shopping reflects that. I welcome additions, corrections, and so forth but I do not tolerate snarky criticism. Every lampworker has their own methods and techniques.
 NEW! Build your own studio in pdf! CLICK HERE
Here you may find useful info and links as I find them. All this information is from my own findings and/or experience. I'm not an expert by any stretch of the imagination, but feel free to expand upon my ideas and information presented here. Mainly this page is to give the curious potential beginner an overview of what this is all about and the investment needed to do it. And a place to save my links. What you won't find here is how to do lampworking. Some tips, yes, but most instruction I leave to the experts. And there is plenty of that available.
For those curious about getting into glass beadmaking let me just say it's addicting and fun, but can be an expensive and involved hobby. My first piece of advice as an advanced beginner is to take a class with an experienced instructor if possible, then get a glass bead kit and try it out to see if you really want to invest in this. I know just enough to show someone how it's done, basically, and am perfectly willing to do so. Read up on the hobby to see if it's really for you. You can be a hobby-sometime-beadmaker working a half hour at a time with a MAPP gas kit, or spend hours a day and go full out with torches and kilns and concentrates, oh my!
 |
| http://www.claregaylard.net/lampworkclasses.htm |
To get started, you don't need a great deal of info but some is essential. You need to know the safety issues and the basic how to. You also need patience as glass won't be rushed. It takes time, effort, and patience to learn how to do this. Even for established artists. And I am NOT an artist, not by any stretch of the imagination, unfortunately. Don't give up!
I have been enamored with glass melting since I was a child. I saw people making little figurines, and as an adult saw folks lampworking. I just didn't know *I* could actually do it myself until a few years ago. I love glass. I collect old jars and bottles. I do stained glass and beading (including wire work). I melt glass. A jack of all trades, master of none.
I will say this, there are as many or more lampworkers as there are colors and types of glass. There is a lot of info, advice, and instruction. And, it's not something that is a big money maker unless your beads are really unique and fantastic, or you become an instructor, write books, and the like. Some can. As I said elsewhere, for me it's a hobby but more of therapy.
 |
| http://www.jewelrymakingdaily.com/ |
Why is it called "Lampworking?"
Lampworking has been around a long time. It is called Lampworking because it originally used a "lamp" or torch (we now use gas flame torches) to manipulate the glass. Glass blowers tend to use furnaces but some use torches. I absolutely LOVE the science of glass and find all aspects fascinating.
A nice history: http://www.glass.co.nz/lampwork.html
An awesome vid on the history of glass and Murano.
What is glass and how is it made?
How is glass colored?
- http://geology.com/articles/color-in-glass.shtml
- http://1st-glass.1st-things.com/articles/glasscolouring.html
- http://chemistry.about.com/cs/inorganic/a/aa032503a.htm
 |
| http://www.compoundchem.com/2015/03/03/coloured-glass/ |
Some glass colors are called "striking colors", which means they change color permanently when put to the flame (sometimes an adjusted flame like oxidizing). More here: Bullseye
What kinds of glass are there?
Terminology: http://www.torchlife.us/terminology.cfm A great source to learn what different things are like COE and who are the various manufacturers of torches.
It would take a couple more web pages to explain all the types, styles, colors, and properties of glass. It's out there for the looking. This is just a start.
 |
| Effetre Color Chart http://www.glassmoose.com/ |
How to get started
The best way to know if this is something for you is to take a lampworking class somewhere. That way you aren't investing in equipment you may not want or need in the future. Just Google where to find lampworking classes (and add in your location to the search). Another good source is to find a bead or lampworking show in your area. I couldn't find a class near me, so I started with a simple kit.
The kit I started with is this one (about $110, sometimes less): Kit Link on Amazon
It's a great kit and all you really need to go with it at first is a can of MAPP gas, which you can get at any hardware store or Lowe's, and they are fairly cheap, and a place to work. The kit itself you can get at Amazon or Hobby Lobby or other sources. Devardi Glass also sells a similar kit. Below is a listing of what is in a typical kit. Get some instructions, be it someone to show you how, a good book, videos on YouTube, or whatever. Devardi has good instruction online and DVDs for sale. The instructions and DVD that come with the Fireworks kit just don't cut it. Trust me. Below are some links to my fav books and vids.
 |
| http://www.sundanceglass.com/ |
Speaking of COE:
As we all know (right?), glass is a liquid. It moves. Like water, it can be liquid or "solid" (although I've never heard of glass gas or vapor...). It expands and contracts with temperature. Coefficient of Expansion - COE - means:
- "The coefficient of thermal expansion describes how the size of an object changes with a change in temperature. Specifically, it measures the fractional change in size per degree change in temperature at a constant pressure. Several types of coefficients have been developed: volumetric, area, and linear. Which is used depends on the particular application and which dimensions are considered important. For solids, one might only be concerned with the change along a length, or over some area." https://en.wikipedia.org/wiki/Thermal_expansion
In short, it has to do with the rate an object heats/cools and expands (or contracts) within its environment. Glass is temperamental. If it doesn't like its environment, it will crack or shatter. If you put a cool glass rod into a flame too quickly it will crack and pop bits off. If heated glass cools too quickly, it can also shatter and crack. Think of what happens when you take a glass object like a pitcher or drinking glass right from a hot dry cycle of the dishwasher - it's hot and dry - and you put it in some cold water. Chhhhhhhhhh!
This is important to know as different types of glass have different COE numbers. Since they cool at different rates, they generally cannot be mixed together in lampworking. Generally, the pieces will crack or fall apart. Know what the COE is for your glass, including decorative additions and frit. It doesn't hurt to experiment on a test piece to see how it holds up.
- Soda Lime glass, aka soft glass, such as Moretti/Effetre, has a COE of 104
- Fusing glass and many others (such as neat looking decorative additions) have a COE of 90 or so.
- Borosilicate (like many pyrex pieces) has a COE of 33
- Most stained glass panes for use in making stained glass pieces have differing COE values. One does not normally heat and cool this glass (just cut and solder) so it doesn't matter the COE for that purpose.
- Recycled glass also can have differing COE values, not to mention any other additives or contaminants one may not know about.
When you hear terms like Moretti/Effetre, Bullseye, Devardi glass, etc., it is generally referring to the manufacturer or supplier, not necessarily the type of glass or its COE.
Types of glass generally are terms like soft glass, soda lime glass, borosilicate, or referred by the COE number.
Here is a bit of info on safety:
Yes, safety. Safety is a big thing with me, having been well trained in the subject. I don't see enough on this out there. This is not scrapbooking where the worst thing you have to worry about is a paper cut or gluing your fingers together. Ignoring or downplaying safety issues with this hobby can have devastating repercussions. Following safe practices makes this quite a safe hobby. Basically, attention to detail.
- Always know your equipment, supplies, and the safety hazards. Lampworking deals with high-temperature open flames and high-pressured gasses. Always use the proper equipment, tools, and supplies for the job. Always.
- The glass working area is NO PLACE for small children or pets. Period. Even when not in use.
- Always keep a good fire extinguisher handy and know how to use it. Check it regularly to make sure it's fully usable.
- It's not a good idea to store flammables or combustibles near your glass table. This is just common sense. A piece of hot glass can fly off and smolder, potentially catching fire later.
- MAPP gas torch flames get up to about 4800 deg F. (yes, these numbers are thousands).
- A propane / oxygen torch flame can get around 5300 deg F. Propane tanks should be stored outside. (Propane itself, as in sweating copper pipes, only gets to about 3623 deg.) Torch gas info: http://www.bernzomatic.com/faq/
- Soft (soda lime/104 COE) glass melts around 1400 deg. F. and softens at 1340 def F. More: http://hypertextbook.com/facts/2002/SaiLee.shtml and https://www.quora.com/At-what-temperature-does-glass-become-malleable-without-melting
- Borosilicate (COE 33) glass melts around 1500 deg. F
- Thermal shock: when glass is exposed to a rapid temperature change it contracts or expands rapidly, causing cracks or shattering. Bits can pop off of a glass rod when heating too quickly and fly several feet, burning what it touches. http://www.wisegeek.org/what-is-thermal-shock.htm
- Skin burns (2nd/3rd deg) in five seconds at 140 deg F.; instantly at 190. And this is with water. Melted glass sticks like a hot sugar solution (in fact, it's not unlike making hard candy, except you use sugar instead of sand... I digress). Chart Keep burn lotion handy as well as a source of cold water.
- Carpet and wood burns - use a burn-resistant flooring. Concrete. Tile.
- Wear covered shoes. Even in summer. Glass shards invariably make it to the floor and can get into and onto feet. I keep my feet covered because hot glass popping off a rod can find the top of a foot.
- A typical bead annealing kiln works at almost 1000 deg F., more or less. Use kiln gloves. I like my annealing kiln because I don't have to put my hands or the full rod into the kiln.
- Torches and kilns are made of metal - they get very hot (not just the flames or elements) to the touch. Kilns are also sensitive equipment; the elements or connections can burn out if knocked.
- Glass rods and mandrels are still very, very hot when taken out of the flame and can burn anything they touch for quite a while after they are removed. I have fingertip scars from picking up the wrong end of a glass rod on the table. Glass cools more slowly than metal. Interesting article on thermodynamics: https://www.quora.com/Thermodynamics/There-are-three-identically-shaped-cups-filled-with-hot-coffee-one-made-of-metal-another-of-ceramic-and-the-third-of-glass-Which-of-the-cups-will-cool-faster-and-why
- A standard oxygen tank is pressurized to about 2200 psi (pounds per square inch). They are heavy, and must be handled carefully. They are stored upright at all times and chained to something unmovable, like a wall. If a tank falls, the valve can hit something and pop off creating an intense pressured missile. My hubby, when he was in the Air Force as an airplane mechanic, saw one go off like a rocket and go right through a concrete wall. Anything the liquid oxygen touches will freeze as its boiling point is a negative 462 deg. F. This can cause an intense and instantaneous chemical burn that you don't even want to think about. Propane and MAPP gas (indeed, any tanked gas) cylinders are also under a lot of pressure.
- NEVER, ever, get any kind of hydrocarbon (grease, oil) near an oxygen tank (or any compressed gas tank). This can cause a violent reaction and an extremely violent explosion. Use only clean tools and have specific tools just for the oxygen tanks. Here is a short vid on what happens when oil and oxygen collide: https://www.youtube.com/watch?v=zFyqilT0ld0
- Tanks and connections can leak gasses into the air. Always and frequently check these and use regulators and other safety equipment. OSHA has regulations regarding the storage of propane and other gasses. Some states have laws about storing it inside. Propane safety: http://www.nfpa.org/safety-information/for-consumers/gasoline-and-propane/propane-safety. Oxygen: http://www.airproducts.com/~/media/Files/PDF/company/product-summary-oxygen.pdf?la=en
- When using metal tools, remember metal conducts heat quickly. Also remember not to use aluminum. It has a melting point of only 1221 deg F. and will melt before the glass does. Stainless steel has a melting point of 2550 deg. F. Brass: 1652 deg. F. plus.
- I only use clean, lead-free glass. Some use recycled glass, but this can be contaminated and cause health concerns. Some folks don't have a problem with it. Plus, knowing the COE of recycled glass is difficult, so one may not be able to combine it with other glass. An article on the subject. I usually don't take chances where safety and health are concerned. Lead glass has been known to leach lead into food, but one is not likely to eat off of beads. Wiki on lead glass safety.
- Carbon Monoxide (CO) is lethal, colorless, and odorless. It is produced by burning fuels, such as automobile exhaust and torches. Inadequate ventilation allows the buildup of CO. The CDC warns:
- "The most common symptoms of CO poisoning are headache, dizziness, weakness, upset stomach, vomiting, chest pain, and confusion. CO symptoms are often described as “flu-like.” If you breathe in a lot of CO it can make you pass out or kill you. People who are sleeping or drunk can die from CO poisoning before they have symptoms." http://www.cdc.gov/co/faqs.htm
- Health issues for lampworkers per the CDC: PDF click here.
Still want to do this? Read on...
My favorite glass working books are:
- This is a great book that explains things simply and thoroughly, and in a good order. She starts with equipment, safety, and set up, goes into basics, then more advanced beadmaking. It's my favorite: The Complete Book of Glass Beadmaking. About $15
- This book is full of ideas and pictures. It's an awesome book for technique. She has great step by step instructions on various techniques with lovely, clear pictures. Passing The Flame. About $60.
- The first two volumes of Contemporary Lampworking: A Practical Guide to Shaping Glass in the Flame. It's actually just one book split in two for ease of handling. About $60 for the set of books 1 and 2, and about $60 for the third book. Having received and skimmed through all, read some, of these books, I have to say they are awesome. I am an info junkie and these books are packed with info on lampworking (including glassblowing) - not just beadmaking - complete with scientific information, history, and resources. What they don't cover, they refer to other publications for. Well worth having in one's library for the serious lampworker. Most of the pictures are black and white and line drawings, but some color photos here and there.
One of my favorite "glassbenders" is Stephanie Sersich. And she's such a sweet person and VERY talented! You can find her here: http://sssbeads.com/
Here she is giving an instruction demo at the Corning Glass Museum:
A good source of YouTube vids for fun and straight-forward instruction is Beads by Laura.
It's always best to check out a number of different sources. The Internet and YouTube has tons. I find lampworking to be both science and art, with the application of how to and methods more of an art and given to personal preference.
 |
| My favorite quote from Stephanie |
My favorite sites for supplies and equipment:
- Devardi Glass http://www.devardiglass.com/ and they sell DVDs on instruction and Natasha is such a big help on everything! .
- Instructional vids: https://www.youtube.com/user/mailbuggy
- Mountain Glass Arts http://www.mountainglass.com/
- Sundance Glass (great place to get an oxygen concentrator) http://www.sundanceglass.com/
- Delphi Glass: http://www.delphiglass.com/new-products/flameworking-supplies/
- CatWalk Tools: http://cattwalk.com/products.htm
- Franz Art Glass: http://www.frantzartglass.com/
- Bullseye Glass: http://www.bullseyeglass.com/
- Northstar: http://northstarglass.com/
- Hobby Lobby http://www.hobbylobby.com/
- Clay King - for Kilns and kiln supplies: http://www.clay-king.com/
- Mid South Ceramic Supply in Nashville TN http://www.midsouthceramics.com/ Evidently they have glass stuff and instruction on occasion. I've not been there yet.
- Fire Mountain Gems - lots of jewelry supplies and some glass stuff http://www.firemountaingems.com/
Forums and Groups:
- A good place for information and help: Lampwork Etc.
- Another: Wet Canvas
- And yet: International Society of Glass Beadmakers
 |
| https://www.pinterest.com/aaamaca/amazing-lampwork-beads-by-glass-artists/ |
What you will need to get glassbending*:
"Glassbending" is a term my teenager gave me. She is a big fan of Avatar, the Last Airbender.
So you're hooked? Hold on to your @$$, Fred (what up, movie reference!-see below). Check out my Studio pictures as well. This list is just to show what you will need. These links and pictures are just suggestions or to show you what the item looks like, not necessarily a recommendation of the source or brand. Some are necessary to safe and effective handling and lampworking, while others are optional. PDF doc on how to set up a studio HERE.
 |
| My first bench |
A ready-made kit (above), or these individual supplies:
- Hot Head torch for use with MAPP gas. Hot Head Torch
- Mandrells. I find 3/32" or 1/8" good to start with. Get at least a dozen. Most kits come with 1/16". http://www.mountainglass.com/Products/MANDRELS/
- MAPP Gas canister holder https://www.etsy.com/listing/224062234/mapp-gas-canister-holder-lampwork-tool Pretty standard across the board.
- A marver. small to medium size for shaping http://www.devardiglass.com/Marvers.htm
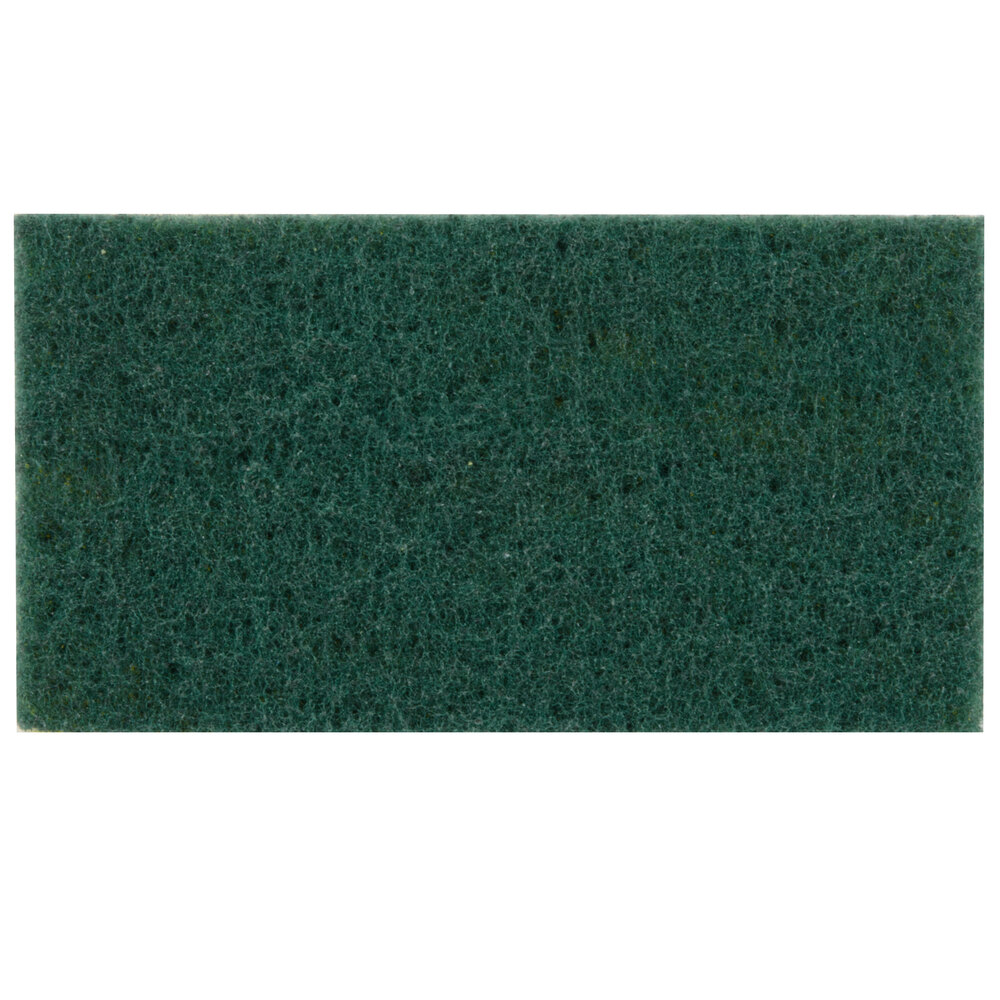
- Rod scrubber (basically a green kitchen scrubbie found anywhere) It looks like this: http://cdnimg2.webstaurantstore.com/images/products/extra_large/67167/233823.jpg
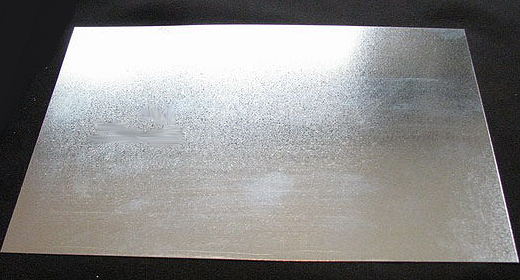
- A heat resistant work surface: you can use a large ceramic tile, sheet of stainless steel, etc. http://www.devardiglass.com/galvsheet.JPG
- Bead release: My favorite is Dip-N-Go Blue Sludge and Ultra releases: http://mangobeads.co.uk/product/dip-and-go-sludge-bead-release-blue/
- Glass Rods. I think it best to start with Effetre (Moretti). I love Devardi's glass, but it takes some getting used to and can pop a lot. The rods that come with the Fireworks kit are Effetre and can be bought in small packs at Amazon and Hobby Lobby. You want to get COE 104 (soft glass), not Borosilicate, to start. It's cheaper and easier to start with. You can learn Boro later. Pick your own or get starter packs: http://www.mountainglass.com/Products/EFFETRE-MORETTI-SOFT-GLASS-COLOR-ROD/
Fireworks starter packs here: http://www.amazon.com/gp/product/B00JG9CJNM?keywords=glass%20rods&qid=1458135497&ref_=sr_1_1&sr=8-1
though my fav source is http://www.mountainglass.com/Products/EFFETRE-MORETTI-SOFT-GLASS-COLOR-ROD/ - Fiber cooling blanket: http://www.mountainglass.com/Fiber-Blanket-20-x-24-x-1.html?sc=2&category=48
- Bead Rake: http://www.mountainglass.com/Stainless-Steel-Rake-In-Wooden-Handle.html
Not included in a standard kit:
- A really good source of information for learning. See above.
- A can of MAPP gas (usually $10 or less at Lowe's or Home Depot.) DO NOT get the blue Propane gas. MAPP gas can is yellow. Propane alone is not hot enough.
- Rod rests for cooling rods. http://www.devardiglass.com/rodrest1.JPG
- Work area. You will need a sturdy table in a well ventilated area. Trust me, you need ventilation. Carbon monoxide poisoning is serious. A decent chair. Good flooring not likely to burn. Do a Google (or whomever) search for Lampworking Studio pictures for ideas.
- My table is high enough to work at standing up as well as using my nice drafting chair. I made it myself and covered the top with ceramic tiles. See pictures in Studio.
- My work area has homemade arm rests covered in leather. I use these due to my disabilities. Totally optional. There is also a device called a Creation Station one can use, but they're rather pricey.
- My chair is a good quality drafting stool with a back and wheels. I got one on Amazon in January 2015 at a cost of about $90 and still love it. It requires assembly but it's fairly easy: Chair
- My flooring is concrete.
- Didymium glasses or protective eye wear that blocks the sodium flare. These are expensive but crucial to saving your eyesight. To begin, a standard pair of safety glasses will do to protect your eyes from glass shards. If you do this regularly, you'll need the yellow flame protection. http://www.devardiglass.com/glasses.htm
- A quenching bowl (ceramic or glass) of water. About the size of a large coffee cup will do. I found a cheap, ceramic soup mug for mine.
- A large metal can (large soup or tomato sauce can) to throw hot discard glass pieces in.
- Fire Extinguisher: ABC type. Keep it within reach.
- First Aid kit with Burn lotion. Keep it within reach.
- A good source of lighting. Daylight is best. Full spectrum is awesome.
- A good source of electricity if you get more electrical equipment. I have a dedicated 20 amp outlet for my kiln, and a separate 20 amp run of outlets for the glass room for heaters, fans, o2 con, etc.
- A bead reamer and some containers to clean your beads with. They need to be cleaned of the bead release when they've cooled. A pair of pliers to hold the mandrel to pull the bead off.
 |
| Bead and mandrel cleaning kit: jars, scrubbies, flour sack towels, pliers, bead reamer. All kept in a nice shoebox bin. |
Still interested? As you advance:
This is where it really starts getting expensive.
- Dual Fuel Torch. You can continue working with a single fuel torch (MAPP) all you want. I prefer the dual-faster and bigger. They run at least $100 with Minors around $200-$250 or more. There are several kinds. You don't need a huge torch to start; you can always upgrade later if you wish. A popular one is the Minor: https://www.waleapparatus.com/product/nortel-minor-lampworking-torch/ I use Devardi's Spartan. This is mine and I love it: http://www.devardiglass.com/Torch.htm
- You'll need to learn how to set this up for the optimal working flame, as well as at what psi to set up your tanks/concentrator. It depends muchly on your torch. This is a good forum post with info on setting these (see esp. #4): http://www.isgb.org/forum/showthread.php?9411-Propane-O2-PSI-settings&p=75541
- Also, you'll need to know about the types of torch flames: neutral, reducing, and oxidizing. http://harrachglass.blogspot.com/2011/12/types-of-torch-flames-for-lampworking.html
 |
| http://www.devardiglass.com/Torches.htm |
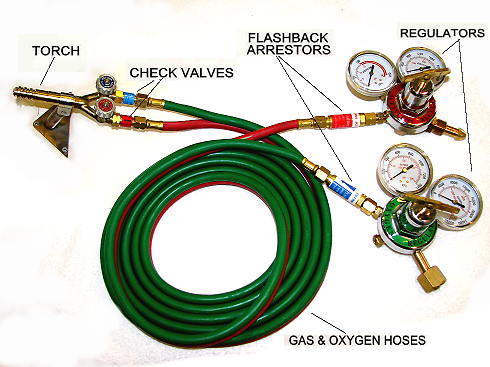
For the torch, you will need (only with dual fuel torch; check requirements with the torch you get):
- A propane gas tank with propane. The kind you get for a grill is fine. Find a way to store it outside (run hoses through a window or whatever). Most gas stations, etc. have these available. Tanks run about $50 with fuel, then refills/change outs depending on gas prices, around $22. They last a while. I keep two in a dedicated wood box outside my studio.
- Oxygen tanks with oxygen (refill service like http://www.tractorsupply.com/tsc/catalog/hardware-tools/welding/welding-gas-cylinder-handling) or an oxygen concentrator (o2 con). Read the safety note on these above! These tanks can be stored inside but must be handled with care. The little ones the size of the MAPP gas will NOT cut it, most folks run out of this within an hour. Lampworking with the dual torch uses a LOT of concentrated oxygen. You can find O2 Cons refurbished. I have no clue the cost of tanks or service, but I got my latest O2 con at http://www.sundanceglass.com/oxygen-concentrator.htm (20 psi) for $730 plus $90 shipping. I got my first one (5 psi) from someone on Amazon.com for about $350. Ebay is another good source. New medical ones are difficult to get as most need a prescription and are quite expensive. Eventually they pay for themselves.
- Hoses for propane and oxygen. Best to get the kit ($110, see pic above) for this and the rest: http://www.devardiglass.com/Torches.htm Use only hoses meant for this purpose!
- Regulators, flashback arrestors, and check valves. Yes, you need these, too. If you get an oxygen concentrator, you won't need an oxygen regulator.
- Substance to check for leaks. Like, soap water. How to check for leaks
- Also, the tools for installing the tanks (about $5). Keep separate install and change out tools just for the tanks, especially for the oxygen. You don't want any kind of grease or oil anywhere near oxygen tanks. See safety list above.
- Torch lighter, tank tool torch cleaner tool.
 |
| $10 accessory kit at Devardi-hose tool, torch cleaner, lighter. http://www.devardiglass.com/Torches.htm |
Much of these things are optional as you like:
- Again: ventilation. Note: ventilation is never optional. Only how you get it. An extractor fan with duct work near your torch, and a source of air (open door/window, fan) pushing air towards your extractor fan, but not on your torch or other equipment. Some use the kind that go over the stove. I built my own for less than $50 with a new fan and parts found. Kimberly Adams shows how to build and set up one in her book, The Complete Book of Glass Beadmaking (link above).
- A wall thermometer. Some equipment needs certain room temperatures to operate, like o2Cons.
- A carbon monoxide detector ($30 or so). http://www.amazon.com/X-Sense-CO03B-Battery-Operated-Monoxide-Electrochemical/dp/B01852NSF8/ref=cm_wl_huc_item
- A kiln for glass annealing. These vary, but run around $660 for a Bluebird Jr. at http://www.clay-king.com/glasskilns.htm. I have the Bluebird ($700). http://www.paragonweb.com/bluebird.cfm You don't need a big one unless you are really into this or going into production. Not all kilns are for glass bead annealing and vary in temperatures and operation. Types of kilns here. You might want kiln gloves and internal racks as well. You can use your fiber blankets for small beads but large beads may crack without a good kiln. Vermiculite (bought at plant nurseries) can also be used but the dust can be considered hazardous and a known carcinogen. I never use Vermiculite, but some swear by it.
If you are only doing a small amount at a time: - Fiber cooling blankets for small beads ( use this in addition to my kiln)
http://www.mountainglass.com/Products/FIBER-BLANKET/ - a small electric annealer ($76)
http://www.devardiglass.com/MiniBeadAnnealer.htm - More mandrels of all sizes. Average $12/dozen depending on size. There are specialty ones as well.
- More bead release, usually runs about $10 per jar. They can dry out but reconstituted with water. Be careful with the dust from dried release (some forms are thought to cause minor health issues). Don't flush it down your drains - it's a clay base and could clog your pipes. Always clean your beads and mandrels in water to avoid dust.
- Something to hold your mandrels. I made holders from 2x4 blocks with holes drilled. This way I can hold them secure while the bead release dries and while I'm working.
 |
| Mandrel forest. |
- Tools: marvers, shapers, knives, picks, pliers, paddles, presses, rakes, tweezers, optic molds, the list is endless. Dental tools are awesome. Old stainless-steel knives. Anything stainless steel or even brass. Needle nose pliers. Glass nippers or cutters. Prices range greatly. Most tools are made from graphite, stainless steel, or brass. Not aluminum.
- More rods as well as frit (ground glass), foils and wires, mica powders, dichroics, enamel powders, fancy rods, murrini, etc. Baking soda makes a cool, rough stone like finish. Some of these you may want to wait until you get basic beads down. Just make sure to get all in the same COE. Stringers (thin glass rods which you can actually make). There are lots of extra things to jazz up beads. Bead inserts and glue for Pandora-style beads.
- Glass rod holders. I made some from PVC pipe. See my Studio for pictures.
- Mandrel storage
 |
| Mandrel storage made from PVC pipe, marked with paint and labels with sizes |
Even more optional but handy (yes, I have these):
- Rod warmer, about $48. Great for shocky glass rods. http://www.devardiglass.com/supplies.htm#PROFESSIONAL GLASS ROD WARMER
- Glass crusher / frit maker (or you can just buy frit). Devardi has one for $31. Just be careful not to inhale glass dust or get it in your skin.
- Ceramic plates or tin lids to hold frit, etc. Again, margarita salt or sugar tins are great. Some people use various marvers or just the table surface (hot glass resistant).
- Appropriate clothing (preferably natural fibers), and perhaps a nice leather apron. I got one for about $75. It's a good style and all around good apron for lampworking: http://www.corinabeads.com/pages/apron.php If you're handy with leather, you can make one.
- Tool holders of all sorts such as peg boards and hooks and jars. My Studio pics shows some ideas. A google search of images Click here
- A drill bit gauge for determining the size of your mandrels, glass rods, and for drilling holes in mandrel holders: http://www.amazon.com/gp/product/B002N2XK1Y?keywords=drill%20gauge&qid=1458409786&ref_=sr_1_1&sr=8-1
- Kiln gloves: http://www.amazon.com/Fuseworks-Hot-Mitts-1-Pair/dp/B001O5SLEW/ref=sr_1_3?ie=UTF8&qid=1458409879&sr=8-3&keywords=kiln+gloves
- Short rod holder. http://www.devardiglass.com/shortholder.htm
- Glass etching solution for etching finished beads (matte look). I made a kit using the lid to a margarita salt tin with notches cut in to hold a drying mandrel. I found the solution at Hobby Lobby.
 |
| Bead etching |
The list is endless. As you can see it can be quite involved and expensive. But worth it if it's for you.
Happy beading!
 |
| My bench. |
-----------------------------------------
Movie reference: Smokey and the Bandit
"What up, movie reference!" modified phrase thanks to !!Superwoman!!
No comments:
Post a Comment